I discovered imgproxy a few months ago. It’s an open source image processing tool. It’s written in Go, it’s really fast and it has a ton of great features. In this tutorial I’ll show you how to configure imgproxy to optimize your WordPress images and serve them in WebP format when supported.
What is imgproxy
imgproxy is an image processing tool written for developers. It processes images on the fly, without storing anything on disk. It has a ton of features, like resizing, format conversion, cropping, trimming, rotating and of course image optimization.
The tool is intended to sit somewhere between a CDN, load balancer or a reverse proxy, and the origin server with the unprocessed image files. Since imgproxy does not have any cache, it also assumes that the end result is cached later by a different service, such as the CDN.
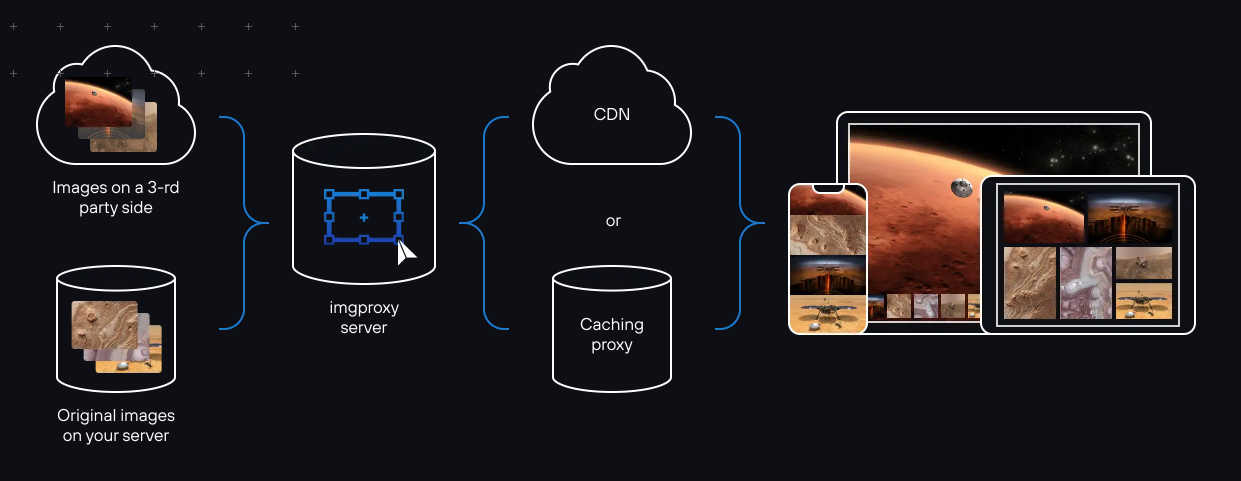
Under the hood imgproxy uses the libvips image processing library, which makes it extremely fast and memory efficient.
Installing imgproxy
The easiest way to install and use imgproxy is by using the pre-built Docker container. In this tutorial we’ll use the DigitalOcean App Platform to run imgproxy. Since our WordPress site will run on DigitalOcean, this will also ensure minimal latency between imgproxy and the origin. For other installation options, refer to the imgproxy documentation.
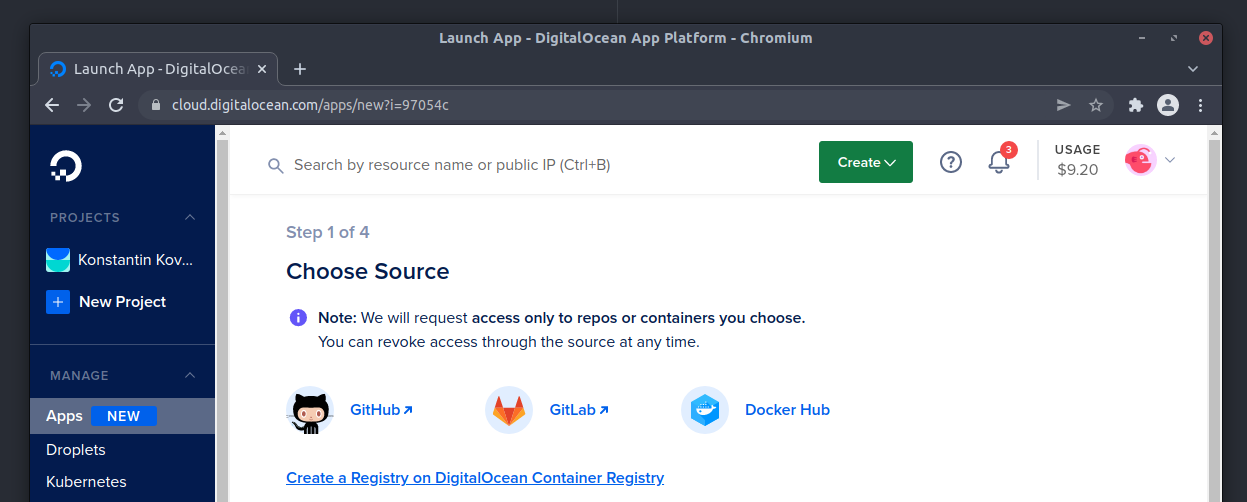
First, I’ll create a new application in the DigitalOcean App Platform control panel, and I’ll select Docker Hub as my source. For the repository name I’ll use the official darthsim/imgproxy with the latest tag. There are plenty of configuration options you could add to the environment variables when deploying imgproxy, but I recommend keeping things as simple as possible for starters.
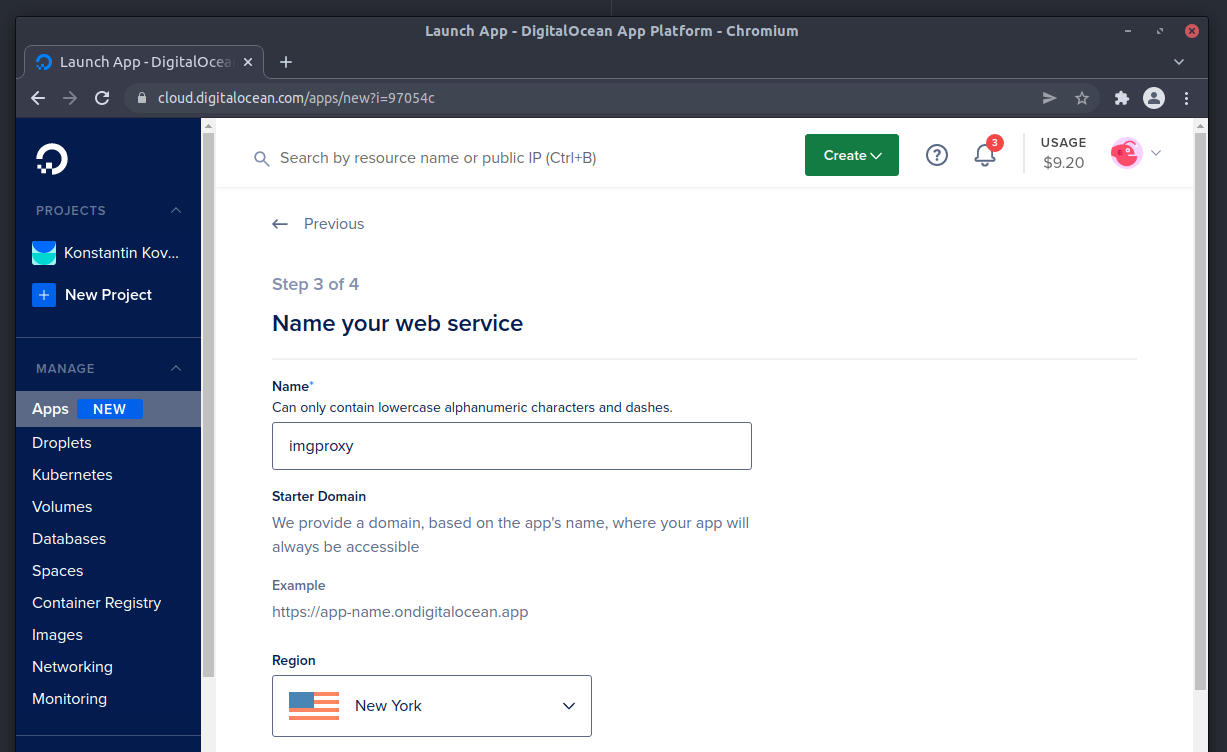
Select a service name, the region where you’d like to deploy the service (pick the same region where your site will be located) and deploy imgproxy on the Basic $5/mo plan. You’ll be able to scale the service or upgrade to the Pro plan at any time in the future.
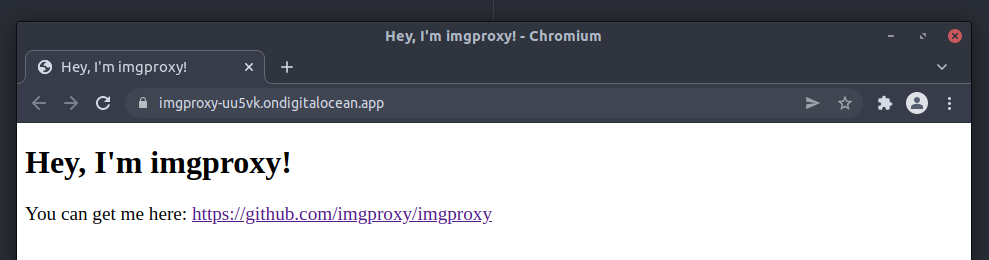
It’ll take a few minutes to build and deploy the new service. When it’s done, you’ll see a Live App button with a link to your imgproxy domain. Note this domain down, since you will need it for all your Nginx configs!
That’s about it for installation. As I mentioned earlier, there are plenty of configuration options to fine-tune imgproxy to your needs, as well as some security options to make sure the application isn’t abused. However if this is your first time deploying imgproxy, I recommend just sticking to all the defaults and not worrying about the security aspect of imgproxy, until it actually becomes a problem.
Installing WordPress
This is the easy part, I’ll just use Sail to provision a WordPress server in the same DigitalOcean region in just a couple of minutes:
$ sail init --region=nyc3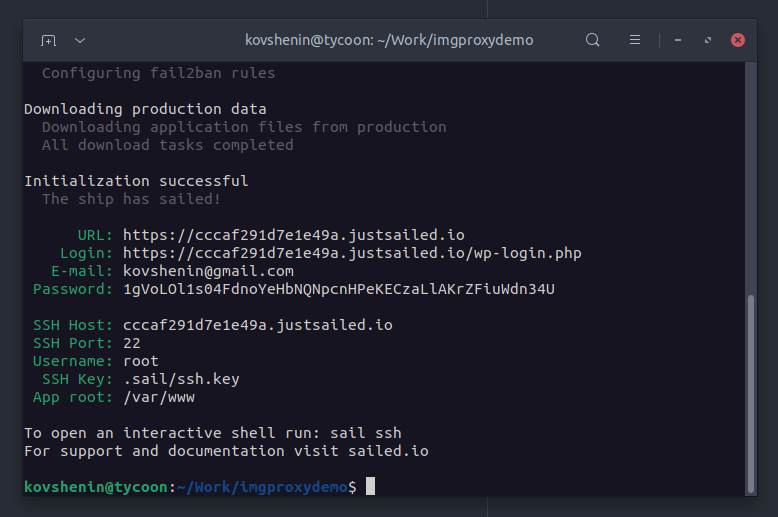
Of course you can use any other method to install WordPress on a DigitalOcean server, including their 1-click install, however note that in this tutorial I’ll cover configuring the Nginx web server for imgproxy, but not Apache.
Let’s also upload a few images to the WordPress media library, to make sure we have things to test our imgproxy setup with.
Testing imgproxy with WordPress
The imgproxy service works by passing data to it via the request URL, most importantly, the source image URL. For example, if my source image is located at:
https://example.org/wp-content/uploads/2022/02/test.pngThen I’ll need to construct the imgproxy request using the following:
https://imgproxy-service.ondigitalocean.app/insecure/plain/https://example.org/wp-content/uploads/2022/02/test.pngYeah, it’s all meshed together. I’ve used only two imgproxy flags/options in this request. The insecure flag means the request does not need a security signature and I’m okay with that for now. The plain flag means the URL that’s passed to the service is going to be plain, and not URL-encoded.
As a result, I should get the original image from the WordPress media library. That said, if you look closely enough, you’ll see that the image differs in size, and that’s because it’s optimized automatically by imgproxy. The default compression quality level is set to 80, but can be changed using an environment variable.
You could resize/crop the image if you like, using the following URL:
https://imgproxy-uu5vk.ondigitalocean.app/insecure/rs:fill:200:200/g:sm/plain/https://example.org/wp-content/uploads/2022/02/test.png@webpThere are a few new arguments here: the rs or resize argument set to crop the image at 200×200, the g flag or gravity option to tell imgproxy how to handle cropping. Finally, the @webp suffix to ask imgproxy to convert the resulting image to WebP.
The imgproxy documentation will guide you through all the other cool features and options. For this tutorial I’ll only want to make sure the image is compressed and converted to WebP, if the browser supports it.
Configuring Nginx
We could write a simple WordPress plugin to replace our original image URLs, with the imgproxy URLs, much like CDN/caching plugins rewrite original URLs to the CDN domains. However here we have the opportunity for a completely transparent implementation.
Meaning that when the user requests the original image, we can internally fetch the image from imgproxy, together with all conversions and optimization, and serve it back to the user. This can be done using the HTTP proxy module in Nginx. We’ll also cache these images with Nginx for a very long time, to make sure imgproxy is used only when something new needs to be processed.
The server context
First let’s add a location block inside our server {} context for all the images we’d like to proxy. In Sail this can be done by creating a configuration file in /var/www/configs/nginx-server-extras.conf:
location ~ \.(jpe?g|png|webp|avif|gif|ico|svg|heic|bmp|tiff) {
    # Our proxy configuration will go here.
}
Next, we’ll want to proxy the request to our imgproxy instance, however keep in mind that imgproxy itself will also request these images, so we’ll have to be careful here to avoid recursive requests. We’ll do this by using a variable to determine, whether the request came from imgproxy, and an error_page trick on the 418 response code to trigger the proxy when necessary:
# Redirect the 418 error to our imgproxy
error_page 418 = @imgproxy;
recursive_error_pages on;

# Abort if the requested file does not exist
if ( !-f $request_filename ) {
    break;
}

# Raise a 418 error if the request is not from our proxy.
if ( $imgproxy != 1 ) {
    return 418;
}
In the same server block let’s define a named location block called @imgproxy. This one’s quite complex, so let’s break it down into several pieces. First, we’ll make sure to use SSL with the proxy server via SNI, this is required if you use the DigitalOcean App platform, since all requests are served using SNI certificates via Cloudflare.
location @imgproxy {
    proxy_ssl_server_name on;
    proxy_ssl_name imgproxy-service.ondigitalocean.app;
Next, we’ll set some proxy headers, these will mainly control the cache headers sent to Cloudflare. We don’t really want to pass the headers the user’s browser sent, so we pass empty ones and have Cloudflare use its own judgement on whether to serve from cache or not.
    proxy_set_header Host imgproxy-service.ondigitalocean.app;
    proxy_set_header If-Modified-Since "";
    proxy_set_header ETag "";
    proxy_set_header Cache-Control "";
Next, we’re going to set some response headers to ignore. These will come from Cloudflare in our case, and will alter the way our Nginx caching will be set up later, which we don’t want, hence the ignore.
    proxy_ignore_headers Cache-Control;
    proxy_ignore_headers Set-Cookie;
    proxy_ignore_headers Expires;
    proxy_ignore_headers X-Accel-Expires;
We’ll add our proxy configuration next, the cache key and namespace to use, as well as our main proxy_pass directive. Note that I’ve used the $webp_suffix variable here, which we’ll define later, but I want to make sure that WebP results are stored under a different cache key.
    proxy_cache_key $scheme$proxy_host$request_uri$webp_suffix;
    proxy_cache imgproxy;
    proxy_pass https://imgproxy-service.ondigitalocean.app:443;
Finally, we’ll want to rewrite all the requests to our named location, to make sure the proxy URL requested is in a format which imgproxy will understand:
    rewrite ^.+$ /insecure/plain/$scheme://$http_host$uri$webp_suffix break;
}
Note that break is part of the rewrite statement and is on the same line, just before the closing location block curly brace. Here’s the full gist of both location blocks for reference. Don’t forget to replace my imgproxy-service.ondigitalocean.app domain with the one where your imgproxy service is running!
At this point we’re missing a few things: the $imgproxy variable that determines whether the request came from imgproxy, the $webp_suffix variable which determines whether the browser supports WebP, as well as the proxy cache configuration.
The http context
These things have to be configured at a higher level in the Nginx configuration, so we’ll use the http {} context. If you’re using Sail, you can add your configuration to the /var/www/configs/nginx-main-extras.conf file:
First, the $imgproxy variable. Quite straightforward here, match the user agent string, if we find “imgproxy” anywhere in the string, set the variable to 1, otherwise 0:
map $http_user_agent $imgproxy {
    "~imgproxy" 1;
    default 0;
}
Next, our $webp_suffix variable, very similar approach, but with the Accept header coming from the browser:
map $http_accept $webp_suffix {
    "~image/webp" "@webp";
    default "";
}
Also note that we set the variable to either an empty string, or @webp which we ultimately append to the imgproxy request to ask for a conversion.
Finally, our proxy cache configuration:
proxy_cache_path /var/cache/nginx/imgproxy levels=1:2 keys_zone=imgproxy:100m inactive=1y max_size=4g;
proxy_cache_valid 200 302 2y;
proxy_cache_valid any 10m;
proxy_cache_use_stale error timeout updating http_500 http_502 http_503 http_504 http_403 http_404 http_429;
proxy_cache_lock on;
You can look the Nginx documentation for a detailed explanation of what each of these directives does. Essentially we’re defining a shared zone with up to 4G of disk storage and 100m of memory storage for keys (1mb is about 8k unique keys). We cache successful requests for up to 2 years, and everything else for 10 minutes. Here’s the full gist for the http context.
Testing things out
Phew! Now it’s time to have some fun. If you refresh your WordPress site, ideally you won’t notice any changes, that’s because of our fully transparent implementation. But we can use curl to inspect the request headers and see where the image is coming from, and in what format:
$ curl -v -o /dev/null https://example.org/wp-content/uploads/2022/02/test.pngNote the Content-Type header, which should be set to image/png if you’re requesting a PNG image. Also note the Content-Length header, and compare it to the original image size. If it’s smaller, then you’re being served a compressed version. If you’re running imgproxy on the DigitalOcean App Platform, you’ll also notice some additional Cloudflare headers.
Testing WebP
The easiest way to test for WebP is to right-click and “Save image as” in a browser that supports WebP like Chrome or Chromium. You could also inspect the response headers, but here’s how you check for WebP support using cURL:
$ curl -v -o /dev/null https://example.org/wp-content/uploads/2022/02/test.png -H "Accept: image/webp"This will send an additional header to the Nginx server, and as a result you should see that the Content-Type header in the response is now image/webp.
Security
If you’re running imgproxy behind a firewall and/or in a local network, there’s not too much to worry about, since it’s only your Nginx instance that will be interacting with the service. If you’re running a public instance, such as one though DigitalOcean’s App Platform (no firewalls unfortunately), then you’ll need to at least use a shared IMGPROXY_SECRET in the imgproxy configuration.
You may opt into signatures as well, though you will probably have to slightly compromise on transparency. Finally, if you’re planning to support dynamic resizing, note that that’s one of the things that can easily be abused by enumerating all possible combinations, so you’ll want some rate-limiting or sizes whitelisting as well.
Further reading
Here are a few additional resources on imgproxy and related things:
- The imgproxy official website
- The imgproxy repository on GitHub
- A primer on imgproxy with a Heroku-based deployment
- The imgproxy documentation
- An Nginx rewriting tutorial
If you’re looking to get your hands on fully transparent image optimization, dynamic resizing and WebP, but don’t want to go through the hassle of setting up and maintaining imgproxy, Sail Premium has it all built into every WordPress instance you provision with Sail.
If you have any questions, comments or suggestions, catch us on Twitter! For more tips and tutorials on WordPress and DevOps, don’t forget to subscribe.